Digital landscape painting
This project is a fairly simple one for those who wish to learn how to create their very first digital painting, and offers some simple techniques to get started quickly. I recommend that you use a Wacom tablet, or an equivalent tablet of your choice, and have installed the latest version of Photoshop on your computer system.
A basic understanding of Photoshop's tool pallete is essential before getting started. The project is presented in a step by step manner with examples shown. If you have two monitors, it is best to use one monitor for displaying each step shown, and the other monitor to use photoshop and follow along. Above all, have fun with it and take your time...you are learning something new, and I promise you won't be graded for this. Mistakes are allowed, and can become great works of art in some cases. Best viewing of this is through a wide screen format.
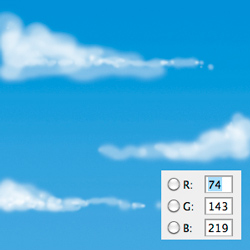
Begin the painting by creating a new image in photoshop at a size
of 300 pixels by 300 pixels at 72 pixels per inch. I then fill the first layer with the rgb values indicated. Create a new layer and name it "clouds". With a soft brush at 30px to 40px in size, I paint some basic strokes of white.
 In the clouds layer, select the“smudge tool” and set the size between 30 to 40 pixels in size. Apply light pressure with your mouse or Wacom pen to push and pull the white clouds in various directions. You will see that if you do this, the positive and negative spaces or areas will become evident. As you push and pull the clouds in various directions you can create very interesting shapes and directions in which the clouds flow. Take your time doing this because it is a personal choice as to how much you want the white pixels in the clouds to stretch or move.
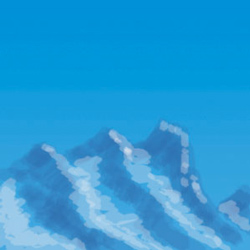
The next item to do, is to hide the clouds layer in photoshop. This is done so that it does not visually interfere with your next step. Add a third layer to your image.
Choose a brush of your choice in photoshop, and set it at a size you wish. I normally use a size of 15 to 30 pixels. Choose a color that is complimentary to the base layer of light blue. In this case, I chose a darker blue which has a slight tint of grey.
Begin painting in the dark blue at an opacity of 30 to 40 percent to create the mountains. When you are satisfied with the shape of your mountains, change your active brush to the smudge tool, and begin shaping the mountains to the desired effect. You will also notice that I have added a color of white to accent the mountain tops. It is your choice as to how much white you want to add at this point.
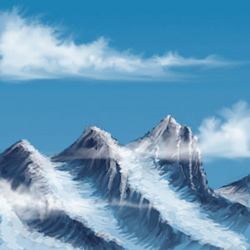
Seeing the composite view
Continue working on your mountains until you are satisfied with the overall look, size and shape, while making adjustments with the smudge and brush tools in photoshop. You can turn "on" the clouds layer to see the whole image as a composite view for reference.
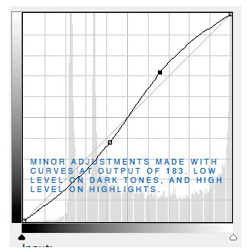
Adjusting the curves settings
Shown here are the general curve settings I used to make adjustments to my image. The settings displayed are higher than normal, so it is a personal preference as to how much you wish to adjust your image. Each layer in the image was adjusted to the desired effect.
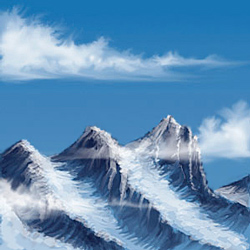
Shown here is the final result of a composite image. The image was saved using the “Save for Web” option in Adobe Photoshop.There are additional tools you can use in photoshop that are not described here, but you are encouraged to use sources directly from training tutorials at Adobe.com.